
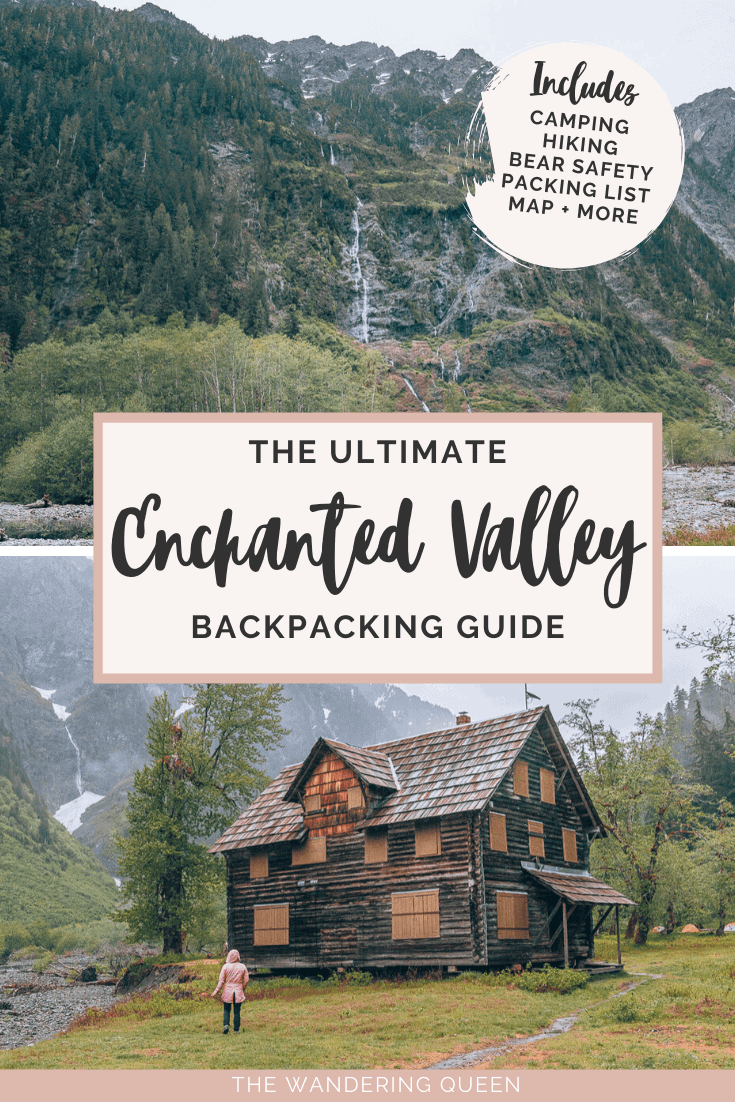
Backpacking Guide To Enchanted Valley Olympic National Park
One of the best backpacking trips in Washington is the Enchanted Valley Olympic National Park Trail. The trail is filled with waterfalls, river views, bridges, beautiful trees, bears, mountains, and it even has a chalet in the valley! The experience was incredible and has by far been my favorite trail in Olympic National Park. Since the trail is on the longer side (26 miles in and out), it is recommended to backpack and spend the night on the trail at least for a night. Planning for a backpacking trip can be stressful which is why I have made this post to make your life a lot easier. This post is packed with information on the trail (like permits, maps, packing lists, etc.). So keep reading on for an ultimate guide on Enchanted Valley Washington.
Disclosure: This post contains affiliate links. If you click one of them, I may receive a small commission (for which I am very grateful for) at no extra cost to you.
Download my free Outdoor Photography Guide
Olympic National Park
Related Posts
Enchanted Valley Map
I made a Google map that highlights all the critical areas, like the trailhead, campgrounds, hotels, etc. You can also view the official National Park Service Map here.
Seattle To Enchanted Valley
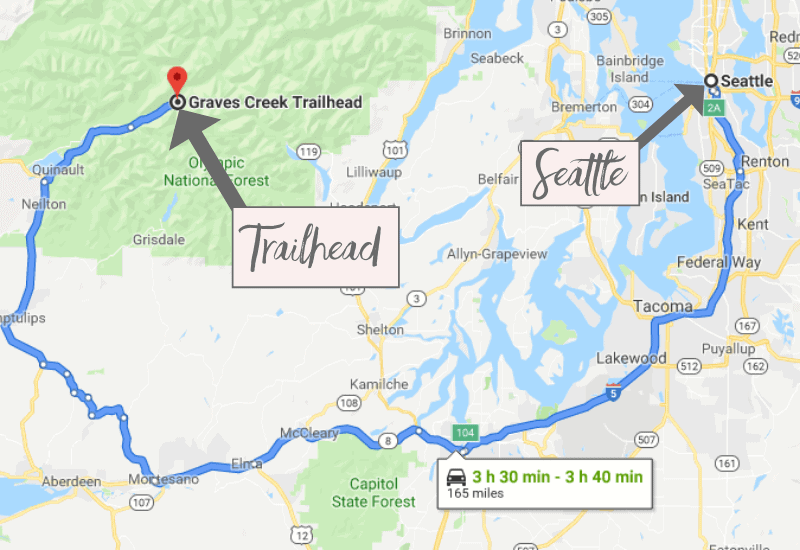
The Graves Creek Trailhead is the start of your Enchanted Valley journey. The easiest way to get here is to drive straight from Seattle through the South End. It is a 3 1/2 hour drive and 165 miles long, and you will avoid tolls and ferries this way. If you are still interested in the ferry information, click here.
The nearest town to the trailhead is called Quinault, and it has accommodation and a few restaurants. If you want to stay in the town for a night, I have more information below.
READ MORE ABOUT OLYMPIC NATIONAL PARK: ULTIMATE GUIDE TO HIKING ONP
What To Pack For Enchanted Valley
- Sunscreen: If you get burned easily like my husband, this is needed. >Buy Sunscreen
- Bug Spray: In case there are bugs. >Buy Bug Spray
- Hiking Boots/Shoes: If you use tennis shoes you can easily hurt your toes hitting a rock by accident (Trust me I have done it so many times). >Check Out My Hiking Shoes
- Hiking socks: Having the correct socks helps prevent blisters. Smart Wool is probably my favorite brand out there. I also love how they now have pink socks too 🙂 >Buy Hiking Socks
- Refillable water bottle: I always bring a Hydroflask on all my adventures. They are on the heavier side, but I know for a fact they will not break. I have had a few cheap water bottles break on me before. >Check Prices Now
- Water: Stay nice and hydrated.
- Sunglasses: Make sure to pack some sunglasses. >Check Out These Sunglasses
- Snacks: The best snacks are jerky, nuts, energy bars. Cliff Bars are great for hiking.
- Camera: The camera I have linked was one of the first cameras I started using on my travels. The Sony A6000 is an excellent camera for people that want to start improving at travel photography. >Buy Sony Camera Here
- First Aid Kit: This is one of the first things I bought when I first started going on adventures. It is super portable. >Buy This Awesome First Aid Kit Here
- Day Pack In Case You Are Day Hiking From One Of The Campgrounds: The REI bag I have linked, we have had for seven years now, and it is still going strong! >Buy This Great Quality Backpack
- Leggings or Hiking Pants: I love wearing leggings while hiking because I love how comfy they are but don’t forget that the PNW is known for being rainy. I still try to wear leggings as much as I can and only wear them in Olympic NP if I know it won’t rain that day. Either way, here are some excellent hiking pants that are super durable and that I wore during this trip. >Click For My Favorite Hiking Pants
- Breathable sweat-wicking shirts
- Sports Bra: For women.
- Jacket: It can get pretty chilly. Bring a Jacket! >Buy My Favorite Jacket
- Light Jacket: The PNW weather can be unpredictable. That is why I brought three jackets with me. It wasn’t so cold when we hiked, so I brought a light jacket. >Buy The Jacket I Am Wearing In The Pictures Here
- Rain Jacket: In case it starts pouring on you, which is always a possibility in the PNW. This is my PNW hiking rainjacket. >Buy A Great Rainjacket Here
- Backpack 50 – 65 Liters: The Osprey (which I have linked) is known to be one of the best brand of backpacks out there. >Buy my Awesome Backpack
- Backpack Cover: I bought this right before the trip, and I used it the second day. It did its job >Buy A Handy Rain Cover
- Tent: I just purchased this new Nemo 2 Person tent, and it packs so small, and it is light! >Buy The Nemo Backpacking Tent
- Jet Boiler: This is a portable mini stove that will boil water for you. This is great if you are bringing dry food >Buy My Jet Boiler
- Propane for Jet Boiler: This can be bought at Walmart or REI on the way to the Olympic National Park.
- Sleeping Pad: A sleeping pad is pretty much a small, packable inflatable mattress. The one I have linked is known to be the best one out there in the market. It will keep you warm, and it is pretty light. >Check Out The Best Sleeping Pad
- Dry Food: Dry food is the perfect food for when you are backpacking. All you have to do is add boiling water. Let me warn you that most dry food doesn’t taste amazing, but it is good enough after a long day of hiking. >Check Out Some Of My Favorite Dry Food
- Spork: A spoon and fork in one. >Buy A Spork Now
- Headlamp: A headlamp is an absolute must! It is a lot more portable and easier to use than a flashlight. >Buy A Headlamp Now
- Pillows: Pillows can take a lot of room, so I recommend buying an inflatable one. The one I have linked, I have had for six years now, and it is STILL going strong. >Buy The EXTREMELY Packable Inflatable Pillows
- Sleeping Bag: One of the most critical aspects of getting a good nights sleep! Bringing a sleeping bag is a must. >Look At Prices
- Compression Pack: This compresses your sleeping bag, so it is easier to pack! >Buy a Compression Pack
- Sandals: I hate wearing my hiking shoes when I am hanging around the campsite, so bringing some sandals for leisure is a must for me. I just bought these, and they are super comfortable. Perfect for camping. >Check Out These Sandals
- Trash Bags: Everything you pack in, you must pack out. Bring a few trash bags with you.
- Printed Campsite Reservation: You have to pick this up at the ranger station and hang it outside your tent.
- Toothbrush, Toothpaste, Medicine & Toiletries
- Bear Canister: You can rent this at the ranger station. I decided to buy one just because I will probably use it many times. >Buy Bear Canister Here
- Bear Canister Holder: The bear canister didn’t fit in my backpack, so I packed it into this carrying case and clipped it on the outside of my bag. >Check Out This Bear Canister Carrying Case
- Bear Spray: You never know if you need it. I bought mine at REI, and I always had it by my side (And yes if you are wondering I did see bears.) Please note that if you are flying to Seattle and you bring this on the plane, it will probably get confiscated. >Buy Your Bear Spray Here
- Fire Starter: If you want to start a fire, this is an easier way. Just pile up the wood on top, and you are golden! >Buy This Cool No Match Needed Fire Starter
- Water Reservoir: You probably need more water than a water bottles worth. >Here Is My Water Reservoir
- Water Filter Straw: I tend to drink a ton of water. That is why I brought the life straw with me in case I ran out of water. The good thing is that the river is next to the trail 80% of the time. >Here Is My Straw
- Olympic National Park Map And Book: I started buying maps and books for national parks to help me plan. You can still get a map at the visitors center, but I love that this one is waterproof and more detailed. >Buy My Map >Buy My Book
Join my Newsletter to receive my free Backpacking Checklist!
Subscribe to have posts delivered straight to your inbox!! PLUS, get my FREE backpacking checklist!
Quinault Washington Weather
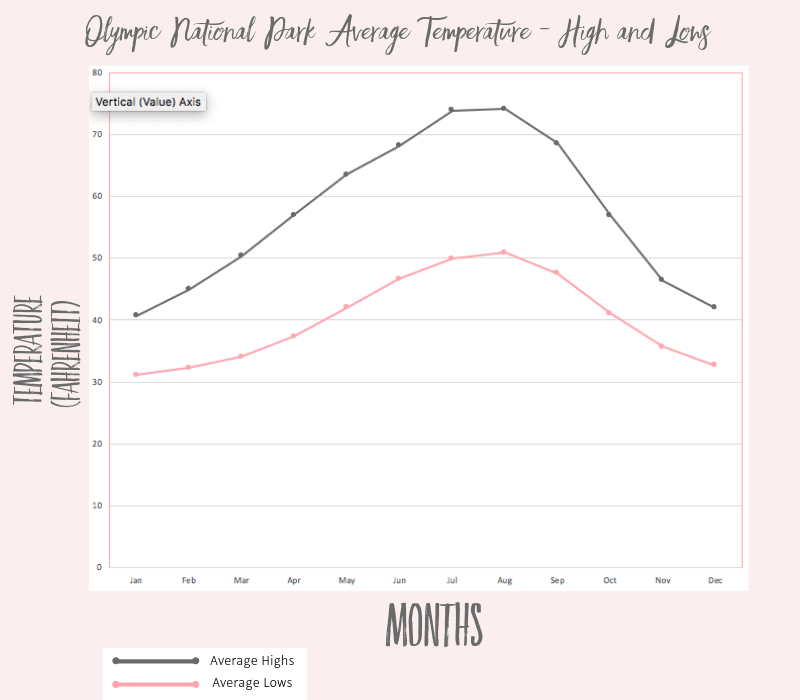
- Spring: Temperatures are cool to mild, and the Quinault weather is unpredictable during this time. But, it is the second most popular time to visit.
- Summer: The most popular time to visit and the temperatures are mild to warm. Rain and thunderstorms are a possibility. This is the best time to get great weather, but it is probably the most crowded.
- Fall: Temperature decreases and precipitation increases during this time of year. People still hike during this time of year but not as many as Spring and Summer.
- Winter: This is when Olympic NP experiences the highest amount of precipitation. Chances of snow on the trail. This is the least popular time to visit.
Read More: Best Time to Visit Olympic National Park
How To Get A Permit
You need to get a permit to be able to backpack to Enchanted Valley. Right, when we arrived at the trailhead, we were asked to show it, and again when we got to the campsite. You can reserve a permit right here. Input your date and group size. It will then ask you which area you need a permit for, so select “Quinault”. Enchanted Valley should be the third to last selection.
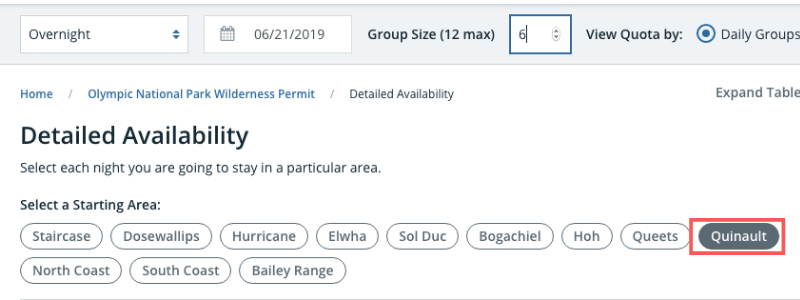
You do need to pick up the permit at the rangers station. After you book the permit, they will email you options on where to pick it up. We picked up the permit at Port Angeles because we needed to pick up other permits as well. Another option is to grab it at Quinault Ranger Station, which is pretty close to the trailhead.
How To Deal With Bears
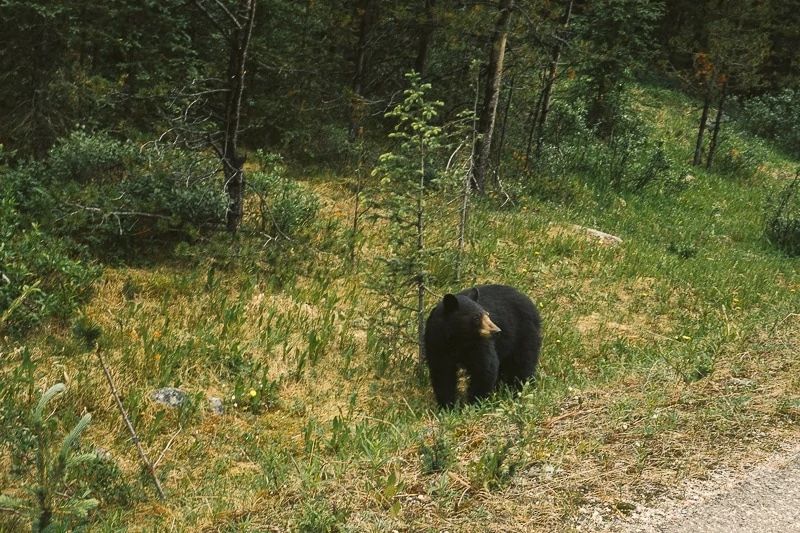
When I started researching about Enchanted Valley, I realized the high probability of spotting a bear. Having seen bears throughout my trip to Banff and Montana, I wasn’t as frightened as I used to be. I read over many times what to do in case I see one, and I had my bear spray on me too.
When I picked up the permit, the Rangers were 99.9% sure I would see a black bear…. and I did. I saw five in total, two mama bears and three cubs. It was probably my favorite part of the trip. If you aren’t used to seeing bears in the wild, please read up on what to do when you see one. As always, never feed or interact with the bears.
Read More: Wildlife Safety Tips
Lodging Near Enchanted Valley
If you want to stay in a more comfortable spot before or after your backpacking trip, here are some hotel options:
- Olympic Lodge: If Enchanted Valley isn’t the only attraction you are visiting in Olympic National Park, then I highly recommend staying at Port Angeles. I stayed at the Olympic Lodge, which is one of the best hotels in the city. It isn’t a five-star hotel, and I feel like the lighting needs some major updating, but, it is the best hotel on the Peninsula. The concierge did tell me that they are remodeling pretty soon though. >Click Here To Check Pricing
- Lake Quinault Lodge: This is the best closest hotel to the trailhead. We stopped here for a bite to eat after our hike (we were starving!) and I loved the cozy feel of this place. It had some cool cabin vibes. >Click Here To Check Pricing
Read More: Where to Stay in Olympic National Park – 10 Best Cabins & Rentals
Camping Near Enchanted Valley
Car camping near Enchanted Valley before or after the trip is an excellent way to relax and to get to know the area. Plus, Lake Quinault is an excellent spot to experience for a day. Here are some of the closest car camping campgrounds:
- Graves Creek Campground: It is located near the trailhead, and it is first come first serve. For more information, click here.
- Gatton Creek Campground: This site is a Lake Quinault Campground, but it is not officially part of the national park. For more information, click here.
- Falls Creek Campground: If you want to experience Lake Quinault Camping, then this is a great spot, but, it is not officially part of the national park. For more information, click here.
- Willaby Campground: This site is a Lake Quinault Campground, but it is not officially part of the national park. For more information, click here.
Backpacking The Enchanted Valley Olympic National Park
- Distance: 26 miles roundtrip (officially)
- Difficulty: Moderate
- How Many Nights Recommended: 2 nights
- Elevation Gain: 1700 Feet
- Parking Pass/Entry Fee: None
- Permit Required: Backcountry Camping Permit as Explained Above
- Trail Guide: Link
I honestly wouldn’t label this trail as difficult. The elevation gain isn’t too bad, and a good portion of the hike usually levels out. It is just looooonnggg. We didn’t keep track of our mileage, but we are pretty sure the trail was longer than 26 miles. The path has changed over the years that it seems like 26 miles is a bit inaccurate.
The long trek is why I recommend staying at least two nights to get a feel for the area entirely. But, if you have limited time like us, one night is okay. You will feel like you barely had a chance to see the chalet.
All the best views in the state
100+ WA Hikes
Embark on Washington’s best trails with our eBook! Inside, find top hikes, expert tips, and stunning views, making every adventure unforgettable. Dive into the beauty of Washington’s outdoors now!
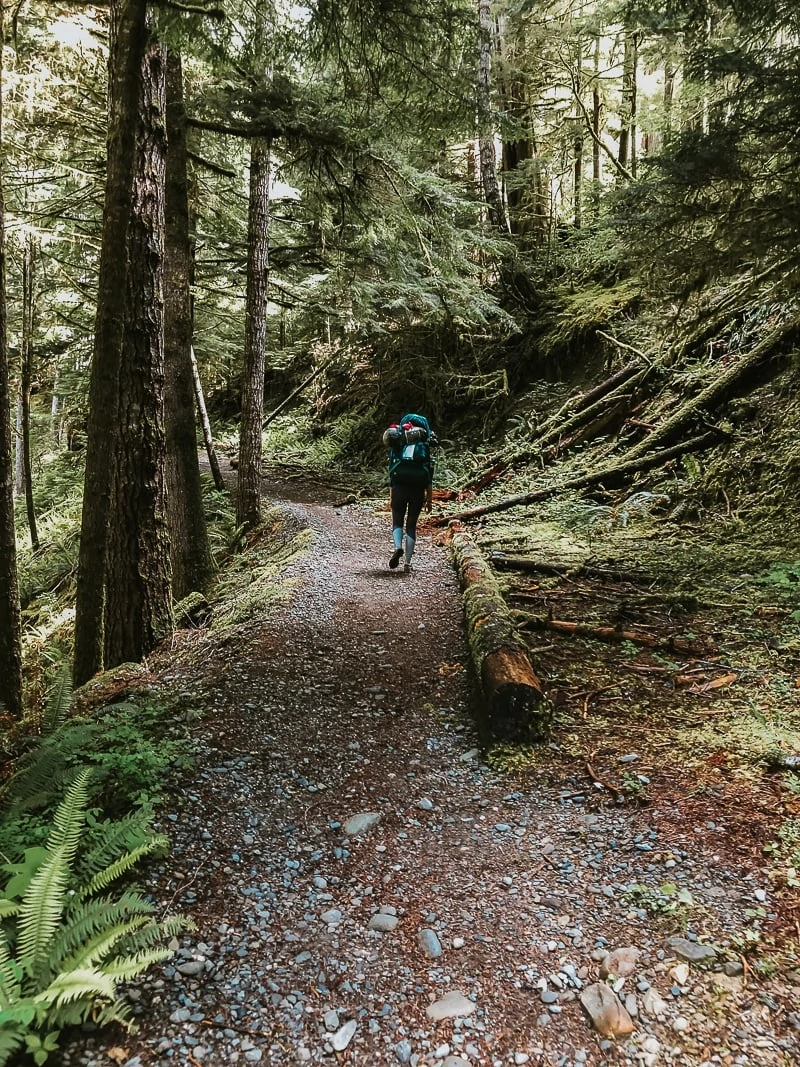
Graves Creek
This is where your adventure begins! Let me warn you that the road to get to Graves Creek is a gravel road. Parking is ok. We were able to find a parking spot easily, but I can see it being pretty difficult during a holiday weekend.
The trailhead has a restroom and trash cans, so I recommend using the restroom before this long trek. The Rangers came up to us while we were getting ready to make sure we brought bear canisters and our permit. Again, they reminded us that we would probably see bears.
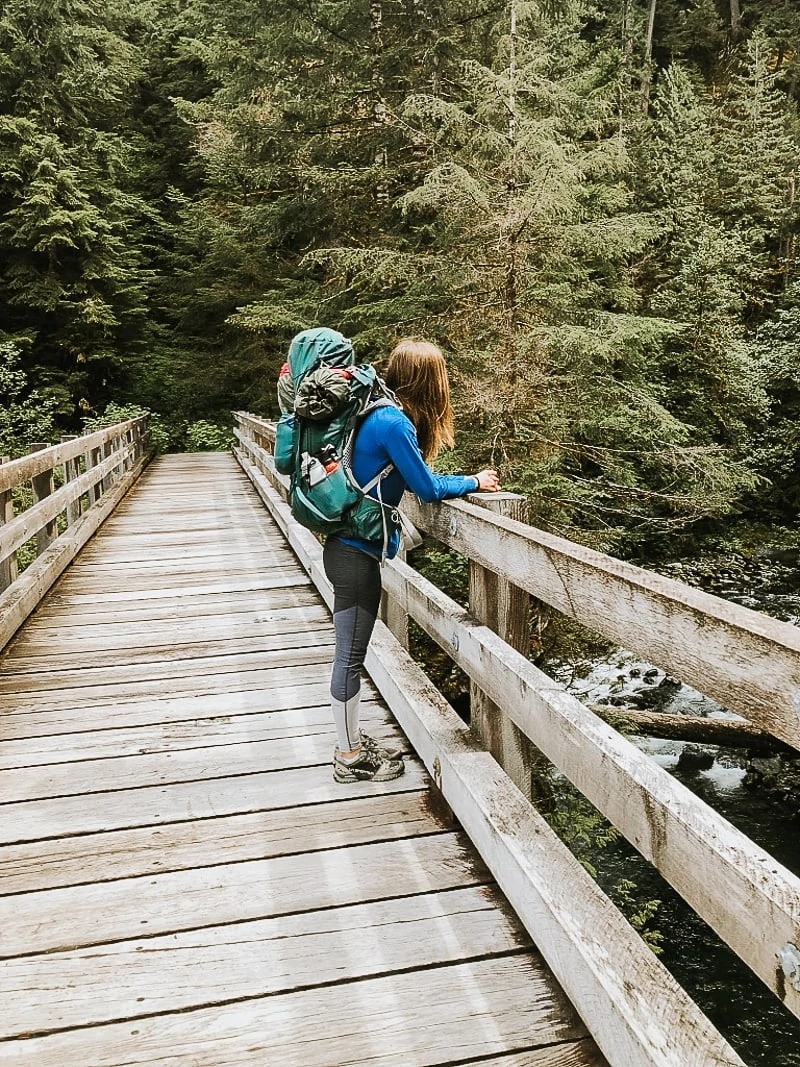
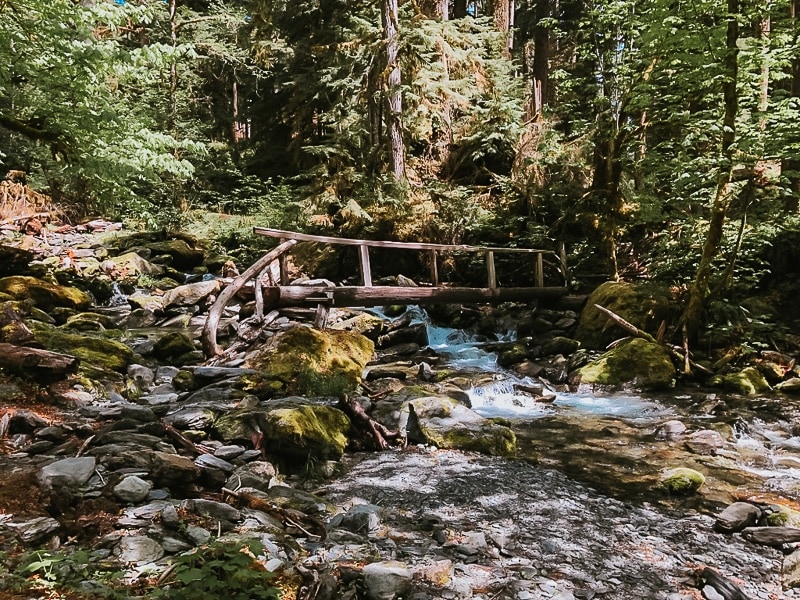
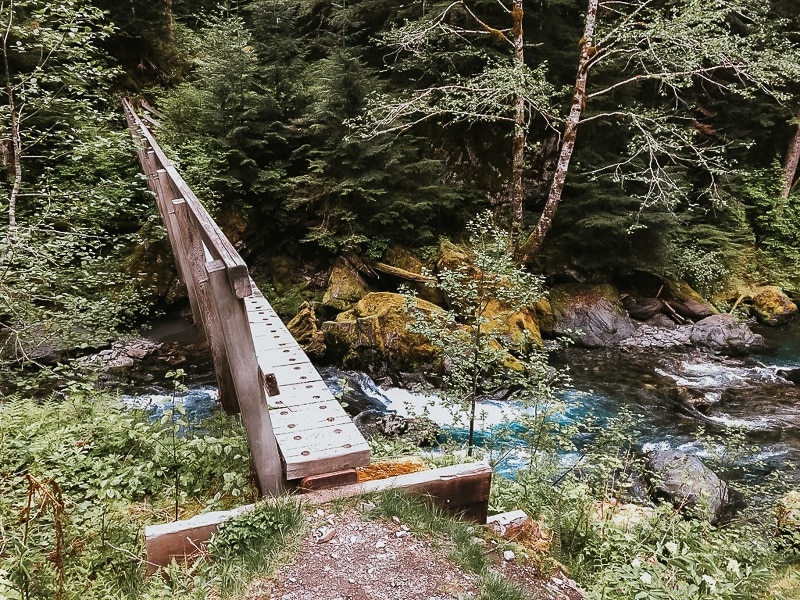
Right at the start of the trail is a cute bridge where you can take a picture. This isn’t the last bridge you will see, though. There are many sprinkled throughout the trek. The numerous bridges and constant running water created a wonderfully calming environment throughout the trail. I loved it.
What I also liked about this trail was that it is a moderate hike. Not too easy, not too hard. Since I did this during the beginning of hiking season, I wasn’t in shape for a hike that was all uphill. But at the same time, I didn’t want the trail to be a walk in the park. This trail was able to give me the best of both worlds. With challenging inclines that would eventually level out to help me catch my breath — the perfect type of hike for a backpacking trip.
Download my Washington Hiking Checklist!
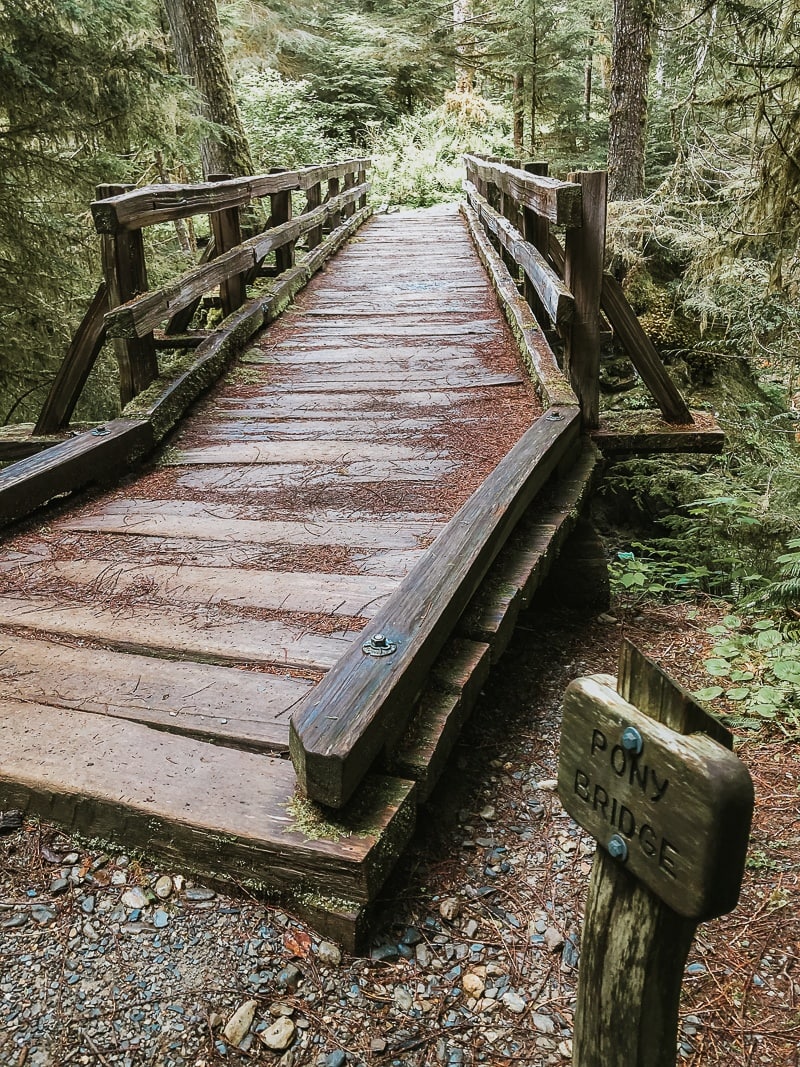
Pony Bridge
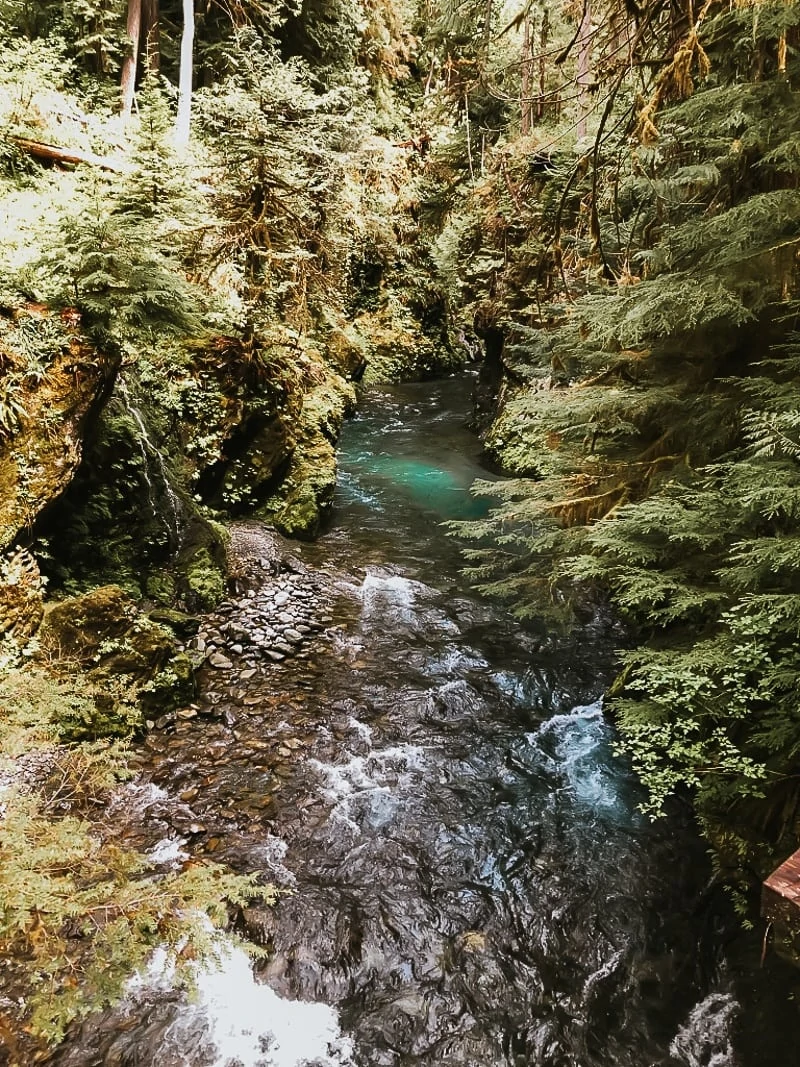
I loved this area that we decided to eat lunch here. You will notice a lot of day hikers throughout the beginning of the trail. They are all making their way to see this beautiful Quinault river bridge. You can see the fantastic blue-green colors of the East Fork Quinault River.
There is a way to get closer to the river, but you have to do a bit of scrambling. We decided against it.
O’Neil Creek
Oneil Creek is when we started to realize that maybe this trail was a lot more than 26 miles. O’Neil Creek is the halfway point of Enchanted Valley. The picture below shows the fork in the road. You can either head down to O’Neil Creek Campground or trek on to Enchanted Valley. Since we didn’t want to spend energy hiking down, then back up, we decided to keep on trucking on.
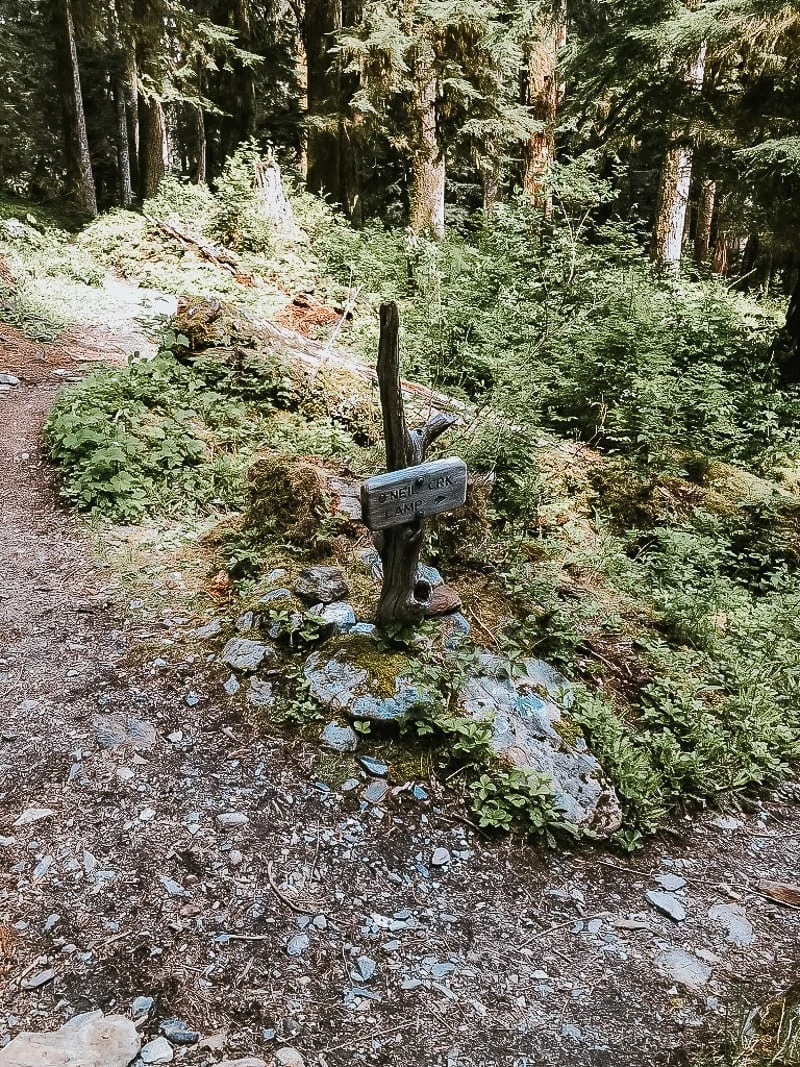
There are two bridges before and after O’Neil Creek Campground if you want to take a break. The one after O’Neil Creek is called No Name Creek.
Pyrites Creek
When we talked to the Rangers, I asked which area the bears were more prevalent. They answered that the bears were in the higher elevation areas. When we got to Pyrites Creek, we ran into a couple of people and they let us know that the bears were just a few miles ahead. I was, of course, excited, my friend Shannon was not too thrilled. We made sure to keep an eye out for any cute bears.
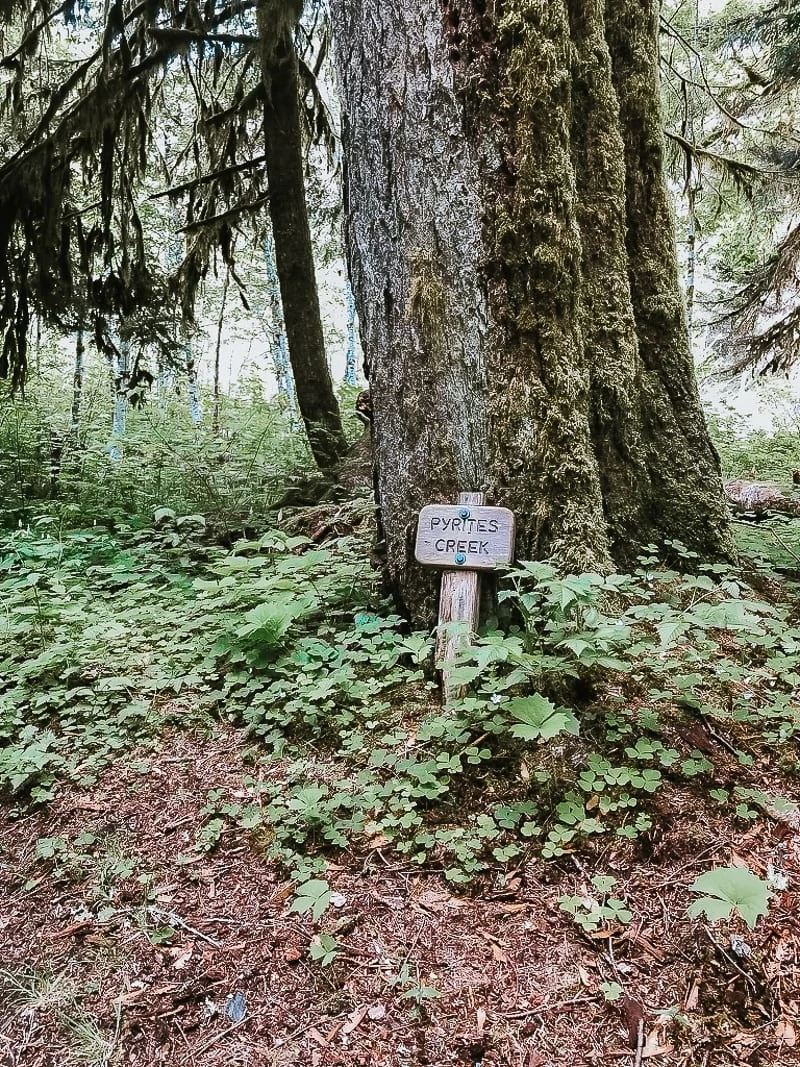
I feel like Pyrites Creek is an excellent place to camp at if you don’t feel like carrying your heavy backpacks anymore. You can pitch a tent and then easily hike with a day pack to Enchanted Valley. I love sunsets and sunrises, so I wanted to stay at Enchanted Valley overnight, but if you are exhausted, Pyrites Creek is a good alternative.
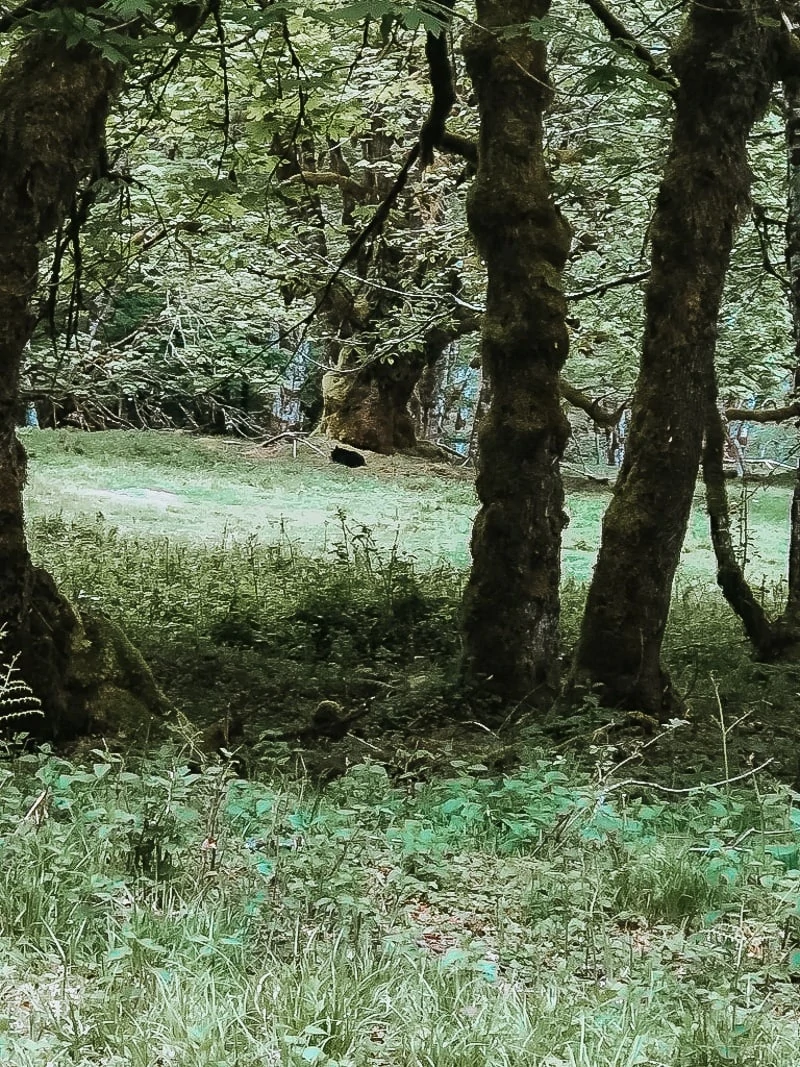
Eventually, we ran into the bears. A momma bear and two cubs. I completely forgot to take pictures with them on my nice camera. Instead, I took pictures of them with my phone. You can see a blurry black blob in the image below. I guess I was too tired or excited to think about whipping out my camera. (Please note that most trail pictures are taken with My iPhone due to the long hike. I took photos of the Chalet with my nice camera though). In total, we saw five bears.
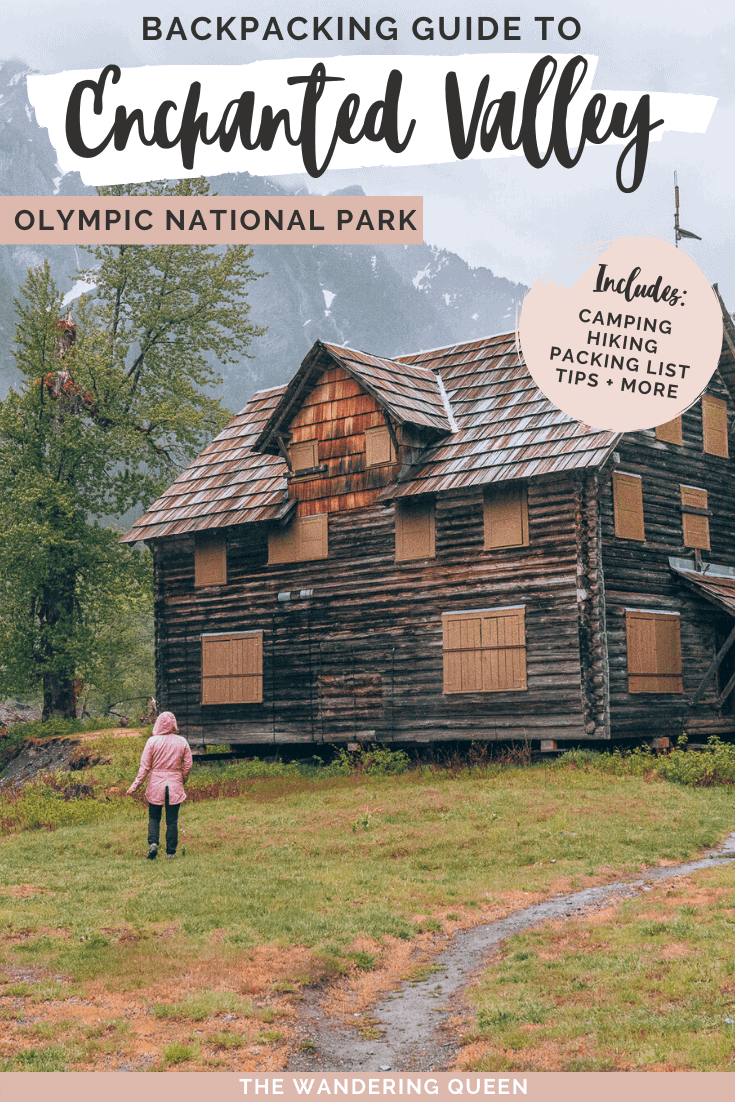
Enchanted Valley
After seeing the bears, we were exhausted. We had been hiking for about 6 hours, and we were ready to relax. When we saw the bridge below, we knew we were close. We saw the Chalet in the distance and the tall standing mountains.
When we finally got to the Chalet, a Ranger came to greet us and to check if we had a bear canister. As you can see, there is no messing around when it comes to feeding the bears. Please make sure to keep a distance from any bears and don’t feed them. The ranger was telling us he was there to keep people away from the bears. I was shocked that people would go out of their way to disturb the animals.
Picking a camping spot is pretty straightforward. There are many spots with fire rings and tables. There is also a restroom, but it isn’t the nicest or cleanest. The river flows right next to the chalet, so we decided to pitch our tents next to the river and chalet. Going to sleep with the river flowing right next to me was the best way to pass out after a long strenuous day!
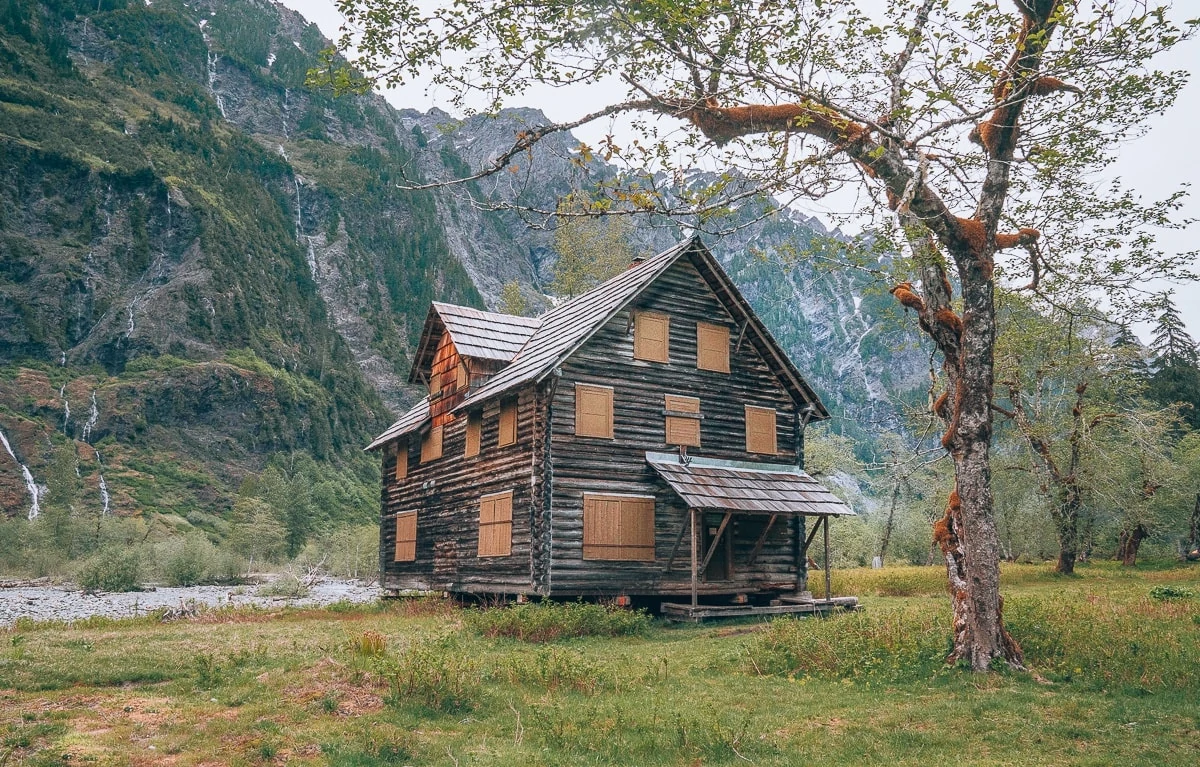
Taking pictures with the Chalet is a must! There are many waterfalls, and you can even go for a little exploring. You can also hike from Enchanted Valley to Anderson Glacier. The elevation gain is a lot more intense, but if you have extra time to spare, it is a good option.
Grab Your Free Car Camping Checklist! 🚗🌲
Ready to elevate your car camping game? Snag our essential checklist to ensure you’ve got everything you need for a stress-free, fun-filled adventure! Perfect for beginners and seasoned campers alike. Download now and hit the road prepared! 🌟🎒
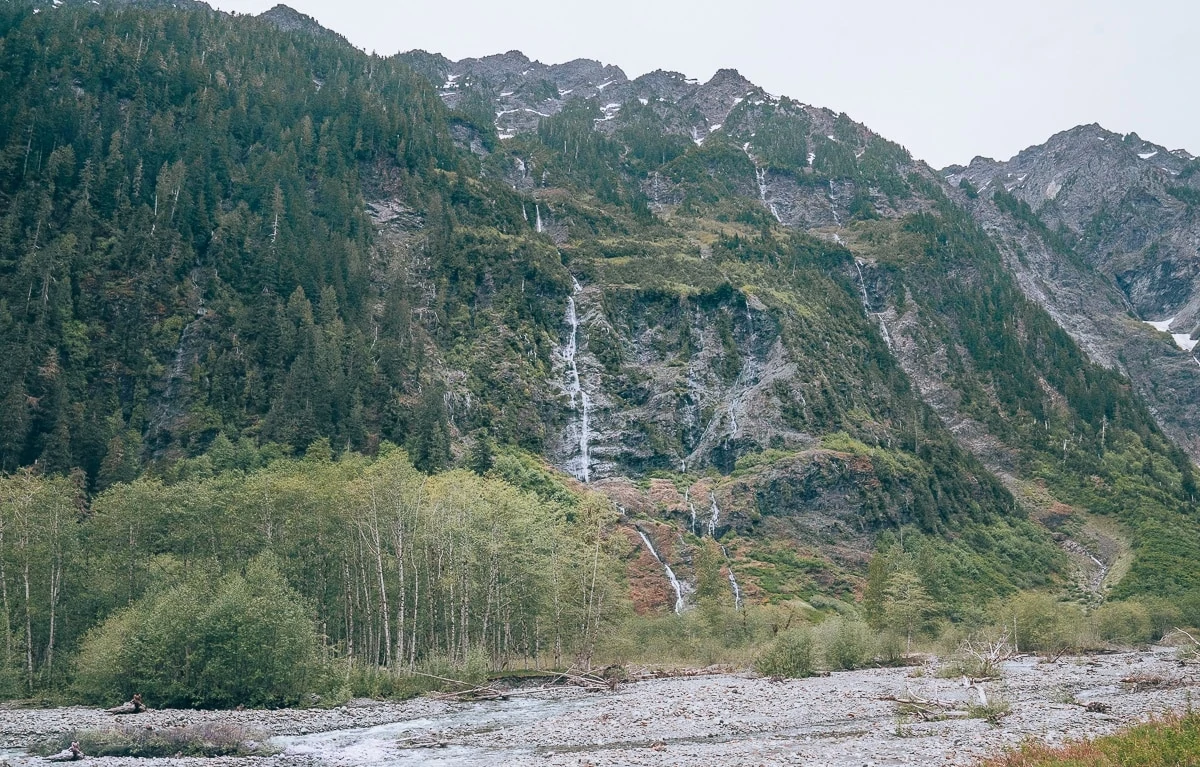
The Chalet has been around since the 1930s and provided a retreat for hikers and horseback riders. The Chalet was an Aircraft Warning Station during World War II and is listed on the National Register of Historic Places. Due to the chalet being too close to the river, entering the chalet is now closed to all hikers, but you can at least camp near it. With the surrounding mountains and the beautiful waterfalls, this spot is a magical place to behold.
Enchanted Valley Trail Conclusion
I hope you enjoyed this Olympic National Park backpacking guide. Please make sure to check out some of my other popular posts or comment below! Until next time 🙂
- Ultimate Guide to Rialto Beach and Hole In The Wall
- Ultimate Guide To Second Beach Camping
- Everything You Need To Know About Hurricane Ridge
- The Best Hikes In Olympic National Park
- A Backpacking Guide To The High Divide Trail
- Backpacking Essentials for Beginners
- The Perfect 2-3 Day Olympic National Park Itinerary

Get my free National Park Checklist
When you join the newsletter!
Enchanted Valley Hike: Pin For Later


This looks like an absolutely epic hike! We love the OP, and we’ll definitely need to plan a couple extra days for this hike the next time we’re in Olympic National Park! Pinning this for later 🙂
So glad you liked it 🙂
This looks like such an amazing hike. We really want to get back to the US and go hiking around Oregan and Washington so this is definitely helpful for planning.
So glad you liked it!
Wow this is absolutely stunning! Enchanted Valley Olympic National Park looks like an amazing place to get away from the city for a little while. I will definitely include this on my list of places to in the Pacific Northwest. This is a great, comprehensive guide!
Thank you!
Go during the snowmelt / spring runoff to see the multitude of many, many Waterfalls and cascades
down the sides of the valley’s mountains !!
Yes I noticed a lot of waterfalls! So beautiful any time of year 🙂
Do you think this trail could be hiked in only one night, if started early (7AM, both days) ?
Yes! I did that! It is just hard and it feels rushed but very doable.
You, my friend, ROCK! I found just the information I already searched all over the place and just couldn’t find it. What a perfect website.